The above scene shows the cloth blowing in the breeze as well as reacting to the movements. This was created using the SYFLEX Cloth simulator in XSI softimage. This was the first time i had ever created a cloth simulation and it took me a number of weeks to get to grip with the simulation basics and proceses. Below is the notes i took and some images to show how I acheived it.
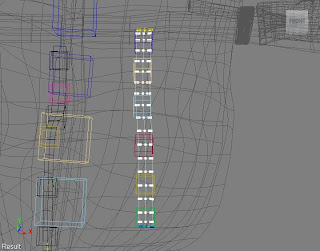
This is a small strip with a null at each end. The nulls are as used parents to split the nerb surface points equally between each by enveloping. This makes the nerb surface stretch equally between the two nulls. The nulls are that constrained to the rig controls. This fixes the strip to the rig controllers by a pose constraint (the compensate constrain button needs to be on as the nulls are constrained to the rig.) so when the rig controllers move the ribbon will flex between the fix point with a good stretching motion.
Cubes are surface constrained to the nerb strip. they are positioned correctly using the constraint controller menu. u and v position sliders. the x,y,z, values need to be at zero or else they will move away from the strip as it deforms with the applied forces. the cubes are attached to the cloth geometry via enveloping the geometry points. when the ribbon moves the cubes move and rotate pulling the cloth geometry with them giving the cloth simulation.
To create the cloth simulation, all the points are selected except the very top line and very bottom line, these are set as a cluster and the cloth sim is added to these selected points. Thus only the selected points will move when the force is added
Then a force is applied, in this case I used wind and gravity. The force values are animatable so the movement can be increased and decreased within the scene. the cache will reload everytime you make a change to the force values or the ribbon position.
Over all i found it better to pre-plan the scene for the syflex, and not just randomley espect it to do its stuff. In some scenes it was easier to switch the syflex off and only put it on in smaller sections of the scene. Having said that It became more controlable the more i got used to it. I literally jumped for joy the night I finally got to grips with it. It was a daunting task at first and many people told me to stay clear of syflex, but i kept plugging away at it a little at a time and finally have some decent results. I also have to add credit to Dipti Sood and Ruha Merchant for helping me workout how to attatch the nerb ribbons to the rig controllers.


No comments:
Post a Comment